Description
Draw pipe: |
Plain Ends – draws a 3D pipe without flanges between 2 points- In the menu, select the pipe diameter.
- Pick a point in your drawing. Drag your mouse and pick a second point to complete the pipe.
Threaded Flange Ends – draws a 3D pipe with ANSI Class 125 threaded flange ends - In the menu, select the pipe diameter.
- Pick a point in your drawing. If adding pipe to a fitting or valve, snap to the center of the red 1/8th inch thick gasket as your start point.
- Rotate the flange to the correct position, then left mouse click to accept.
- Drag your cursor to the second point and snap to the center of the red gasket.
- Rotate the flange to the correct position, then left mouse click to accept.
|

Pipe run with companion flanges – draws 3D pipe with ANSI class 125 flanged ends and bolts in overall lengths of 10′-0″ or 20′-0″
- This feature is handy for drawing long pipe runs.
- Draw a line between two points. The line can be a given length, or snap a line between two specific points.
- In the menu, select an overall pipe length, then a pipe diameter.
- Select the line in your drawing.
- The line will be filled with the length of pipe you chose. You can fill in the remaining line by using the “Threaded flange ends” pipe in the menu.
- The pipe lengths are individual blocks and can be moved to avoid interferences between flanges and pipe support steel, for example.

Pipe fittings, couplings, expansion joints: |
| All pipe fittings contain a red 1/8″ thick gasket on the flanges. If you’re mating two fittings, be sure to overlap the gaskets for proper spacing. All pipe fittings contain user defined and hidden attributes used for data extraction: User defined attributes: - Manufacturer
- Model Number
- Line Number – if you’re working with a P&ID, type the corresponding line number or leave it blank.
Hidden constant attributes: - Size
- Description
- Material
- Ends
- Standard
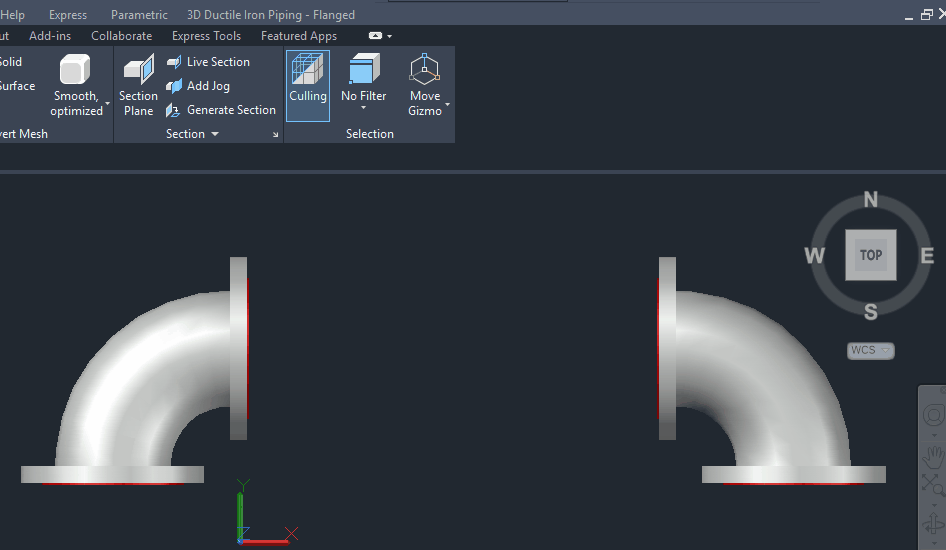
How to insert pipe fittings: - When your UCS is set to World or View, the fittings will appear in side view on your cursor. Rotate the UCS as needed.
- Choose a pipe size, then a fitting type.
- The fitting will appear on your cursor with a preset insertion point located at the centerline intersection.
- While the fitting is on your cursor, you can change the insertion point to a more convenient location:
- Type B in the command line, press Enter.
- Snap to another point on the pipe fitting for insertion. For example, snap to the center of a flange to place a fitting on another flange.
- Insert the fitting in your drawing and rotate to the desired position.
- A window will appear. Input information for a data extraction to create a bill of material, or leave it blank.
|
Wall pipe: |
All wall pipe fittings contain user defined and hidden attributes used for data extraction:User defined attributes: - Manufacturer
- Line Number – if you’re working with a P&ID, type the corresponding line number or leave it blank.
Hidden constant attributes: - Size
- Description
- Material
- Ends
Wall pipes contain a Dynamic Block feature that allows you to stretch the pipe in increments of 1/4″- Set your Visual Style to 2D Wireframe for the Dynamic Block to function properly.
- Select a wall pipe size.
- Insert it in your drawing and rotate to the desired position.
- Left mouse click on the wall pipe to activate the Dynamic Block feature.
- Click on a blue arrow. Drag your cursor to lengthen the pipe, or type a length in the blue window.
|

Bolt / Gasket Sets: |
| All bolt sets contain user defined and hidden attributes used for data extraction: User defined attributes: - Manufacturer
- Model Number
- Line Number – if you’re working with a P&ID, type the corresponding line number or leave it blank.
Hidden constant attributes: Insert bolt sets for mating flanges or butterfly valves: - In the menu, select the appropriate bolt set.
- All symbols have preset insertion points for bolts. Place your cursor over the center of the red gasket and snap to the preset point.
- Rotate the bolt set to the desired position.
- A window will appear for adding information for a data extraction, or click OK if you do not need to add anything.
|
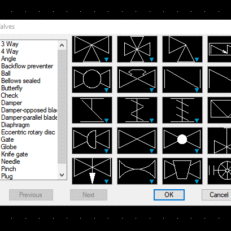
Valves: |
| All valves contain user defined and hidden attributes used for data extraction: User defined attributes: - Manufacturer
- Model Number
- Line Number – if you’re working with a P&ID, type the corresponding line number or leave it blank.
- Valve Number – if you’re working with a P&ID, type the corresponding valve number or leave it blank.
Hidden constant attributes: - Size
- Description
- Material
- Ends
How to insert valves: - When your UCS is set to World or View, the valves will appear in side view on your cursor. Rotate the UCS as needed.
- In the menu, select a valve type and size.
- The valve will appear on your cursor with a preset insertion point located at the center.
- While the valve is on your cursor, you can change the insertion point to a more convenient location:
- Type B in the command line, press Enter.
- Snap to another point on the valve for insertion. For example, snap to the center of a flange to place the valve on another flange.
- Insert the valve in your drawing and rotate to the desired position.
- A window will appear. Input information for a data extraction to create a bill of material, or leave it blank.
- Valves with handles can be modified to show the handle open or closed. After you insert the valve, left click on it to activate this feature.
- Click the blue triangle and make your selection.
|
Data Extraction: |
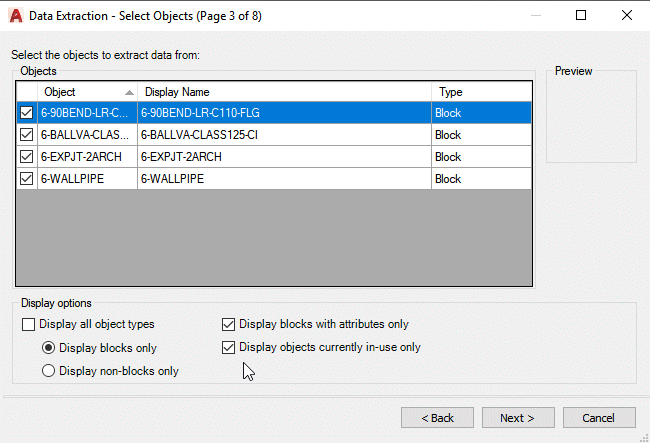
| When running a Data Extraction, page 3 of 8, set the “Display options” as shown: |

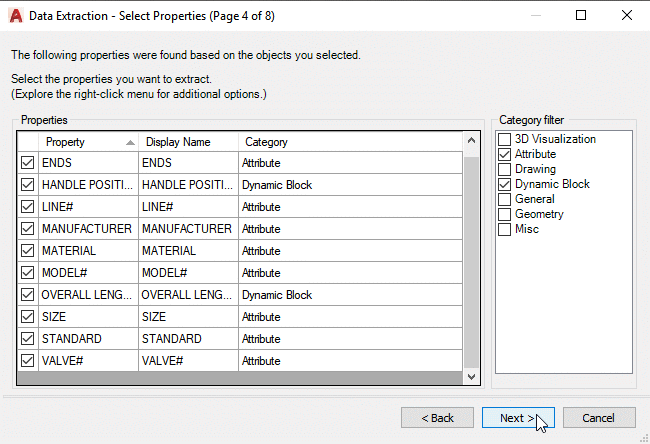
On page 4 of 8, set the “Category filter” as shown:

Click Next. On page 5 of 8 you can select columns to hide, rename columns, etc. and continue from there to complete the Data Extraction process.
Here’s what you get:
- Contains 1,214 3D pipe fittings, flanges, valves, bolt sets, expansion joints, etc.
- Flanged pipe fittings conform to standard AWWA C110/A21.10 in sizes 3″ through 48″.
- Generate a Bill of Material. Run AutoCAD’s Data Extraction command after your layout is complete.
- Works with inch, millimeter and feet drawing units.
- Quickly choose the 3D pipe symbol you need from a single menu.
- Short learning curve. You’ll quickly be productive.
Pipe fittings:
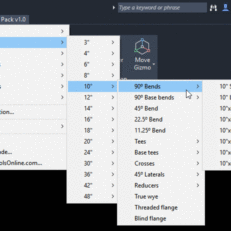
Ductile Iron Flanged Fittings – Sizes 3″ through 48″
- 90º Bends & reducing bends – long & short radius
- 90º Base bends & reducing base bends – long & short radius
- 60º Bends
- 45º Bends
- 30º Bends
- 22 1/2º Bends
- Tees – full size & reducing
- Base tees – full size & reducing
- Crosses – full size & reducing
- 45º Laterals – full size & reducing
- Reducers – concentric & eccentric
- True wyes
- Blind flanges
Bolt & gasket sets
Wall pipe with collar – user defined lengths
Rubber expansion joints – 1, 2 & 3 arch
Pipe repair couplings
Iron Flanged Valves with class 125 Flanges
- Angle
- Ball
- Butterfly – lug, wafer & flanged
- Check – swing & wafer
- Diaphragm – straight & weir
- Gate
- Globe
- Plug
- Wedge gate
System requirements…
- Compatible with full AutoCAD 2006 and newer
- 177 megabytes of available disc space on your C: drive is required