Are you new to the AutoCAD Wipeout command and feeling overwhelmed by all the command options and how to use them? Fear not! This blog post will guide you through the essential AutoCAD wipeout command, a handy tool for keeping your drawings clean and clutter-free. If you need to add wipeouts to arcs, circles, polylines with arcs, or non-closed polylines, check out the AutoMask Wipeout App at the bottom of this post.
What is a Wipeout?
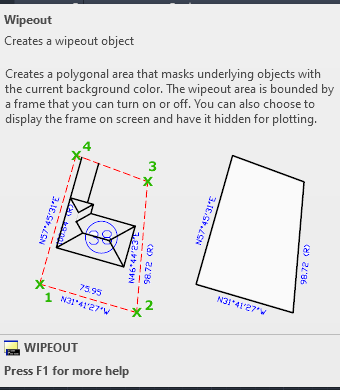
Imagine you’re working on a detailed architectural drawing. Unnecessary elements like dimensions, text annotations, or unwanted geometry might distract from the main design. A wipeout acts like a digital eraser, masking these elements with the current background color, essentially hiding them from view.
Getting Started with Wipeout:
There are two main ways to access the wipeout command:
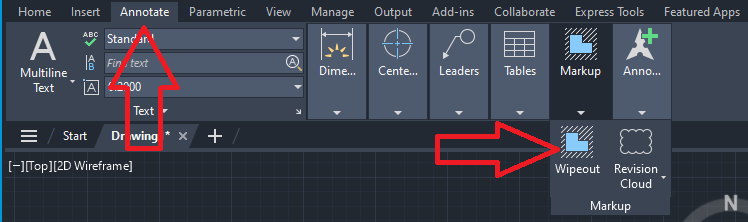
- Ribbon Menu: Locate the “Annotate” tab on the ribbon. In the “Markup” panel, you’ll find the “Wipeout” button.
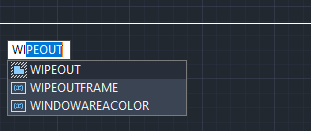
- Command Line: Alternatively, type “WI” (the short alias for wipeout) into the command line at the bottom of your AutoCAD window and press Enter.
Creating a Wipeout:
Once you’ve initiated the wipeout command, AutoCAD will prompt you to specify points.
Command: WIPEOUT
Specify first point or [Frames/Polyline] :
Click around the perimeter of the area you want to hide, following your desired shape. Each click defines a corner point of the wipeout boundary. Double-click or press Enter to finalize the shape.
Understanding Wipeout Options:
While creating a wipeout, you will see the options [Frames/Polyline]. Frames are essentially the outline of the wipeout boundary. We will discuss the Polyline option in an upcoming post. Here’s a breakdown of your options:
- On: This makes the frame visible, clearly distinguishing the hidden area from the rest of the drawing.
- Off: The frame disappears, leaving only the hidden area visible. This can provide a cleaner look.
Editing Wipeouts:
Just like any other AutoCAD object, wipeouts can be edited after creation. Select the wipeout, and grips will appear at each corner point. Drag these grips to modify the shape. You can also use the “Properties” palette to adjust the fill color or assign the wipeout to a specific layer for better organization.
Wipeouts: Your Drawing’s Best Friend:
Mastering the wipeout command is a valuable skill for any AutoCAD user. It helps you present clear, concise drawings by hiding unnecessary clutter. So, the next time your drawing feels overloaded, remember the wipeout – a simple tool that significantly impacts your design communication.
Wipeout has a lot more to offer, so stay tuned for the next post.